Are you looking to connect your domain from any registrar to Namecheap hosting but feeling a bit overwhelmed by the process? Don’t worry, I’ve got you covered! In this comprehensive guide, I’ll walk you through the steps to seamlessly link your domain to Namecheap hosting, so you can get your website up and running in no time.
Before we dive into the nitty-gritty details, let’s first understand why connecting your domain to your hosting provider is crucial. When you purchase a domain from a registrar like GoDaddy, Namecheap, or any other provider, it’s like renting a digital address for your website. On the other hand, hosting is where all your website’s files, images, and content are stored. By linking your domain to your hosting provider, you ensure that when someone types in your domain name, they are directed to the correct server where your website is hosted.
Now, let’s get started on connecting your domain from any registrar to Namecheap hosting:
Step 1: Obtain Namecheap Hosting Information
The first step is to gather the necessary information from your Namecheap hosting account. Log in to your Namecheap account and navigate to the ‘Dashboard’ or ‘Hosting’ section to find your hosting account details. You will need information such as your hosting nameservers, which are like the GPS coordinates that point your domain to the correct server.
Step 2: Access Your Domain Registrar Account
Next, log in to your domain registrar account where you purchased your domain (e.g., GoDaddy, Namecheap, etc.). Look for the domain management section, where you can make changes to your domain settings.
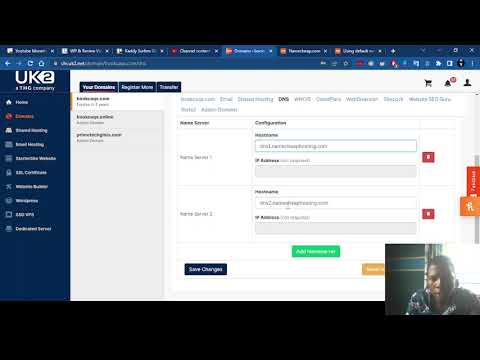
Step 3: Update Nameservers
In the domain management section of your registrar account, locate the option to update nameservers. Enter the nameservers provided by Namecheap into the respective fields. Typically, there are two nameservers that you need to update. Save the changes, and it may take some time for the changes to propagate across the internet.
Step 4: Verify Connection
Once you have updated the nameservers, you can verify the connection between your domain and Namecheap hosting. You can do this by typing your domain name into a web browser and checking if it directs you to your website hosted on Namecheap. If everything is set up correctly, your website should load without any issues.
Step 5: Test Functionality
After verifying the connection, it’s essential to test the functionality of your website. Click through different pages,


