Are you ready to create your own website using WordPress? Look no further than Bluehost, one of the most popular web hosting providers in the industry. In this Bluehost WordPress tutorial, we will guide you through the process of setting up your WordPress website in under 10 minutes.
Why Choose Bluehost?
Bluehost is recommended by WordPress.org as one of the best web hosting providers. With over 2 million websites hosted on their platform, Bluehost offers a reliable and secure hosting environment for your WordPress site. They provide excellent customer support, a user-friendly interface, and affordable pricing plans.
Step 1: Sign Up for Bluehost
To get started, visit the Bluehost website and click on the “Get Started” button. Bluehost offers different hosting plans, but for most beginners, the basic plan is sufficient. It includes a free domain name, SSL certificate, and 24/7 customer support.
Step 2: Choose a Domain Name
A domain name is the address of your website (e.g., www.yourwebsite.com). Bluehost offers a free domain name for the first year. Enter your desired domain name in the “New Domain” box and click “Next”. If your desired domain name is not available, Bluehost will suggest alternatives.
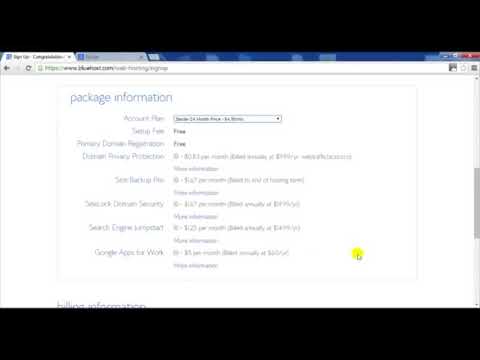
Step 3: Create Your Bluehost Account
Fill in your personal information, including your name, address, and email. Choose the hosting package that suits your needs. Bluehost offers 12, 24, and 36-month plans. The longer the plan, the cheaper the monthly price. Uncheck any additional services that you don’t need. Review the package details and click “Next” to proceed.
Step 4: Install WordPress
After signing up, Bluehost will automatically install WordPress for you. You will be prompted to choose a WordPress theme. You can either select a theme from the available options or skip this step and choose a theme later. Bluehost offers a wide range of free and premium themes to customize the look and feel of your website.
Step 5: Customize Your Website
Once WordPress is installed, you can log in to your WordPress dashboard by visiting www.yourwebsite.com/wp-admin. Enter your username and password, which you created during the Bluehost sign-up process. You will be redirected to the WordPress dashboard, where you can customize your website’s appearance, add content, and install plugins.
Step 6: Install Essential Plugins
Plugins are like apps for your WordPress website. They


